Overview
Last Updated: 1 year ago
Hiraeth Pixel Studio documentation
Getting Started › Introduction
Hiraeth Pixel Studio is an Unreal Engine Editor Utility Widget designed to streamline the creation of icons and thumbnails for Static meshes, Skeletal meshes, and Blueprints, as well as the creation of sprites and flipbooks for Skeletal Meshes.
The tool offers a user-friendly interface and a comprehensive set of features to enhance your workflow and ensure high-quality visual assets.
Getting Started › Importing Assets
Assets can be dragged and dropped from the Content Browser into the Drop area.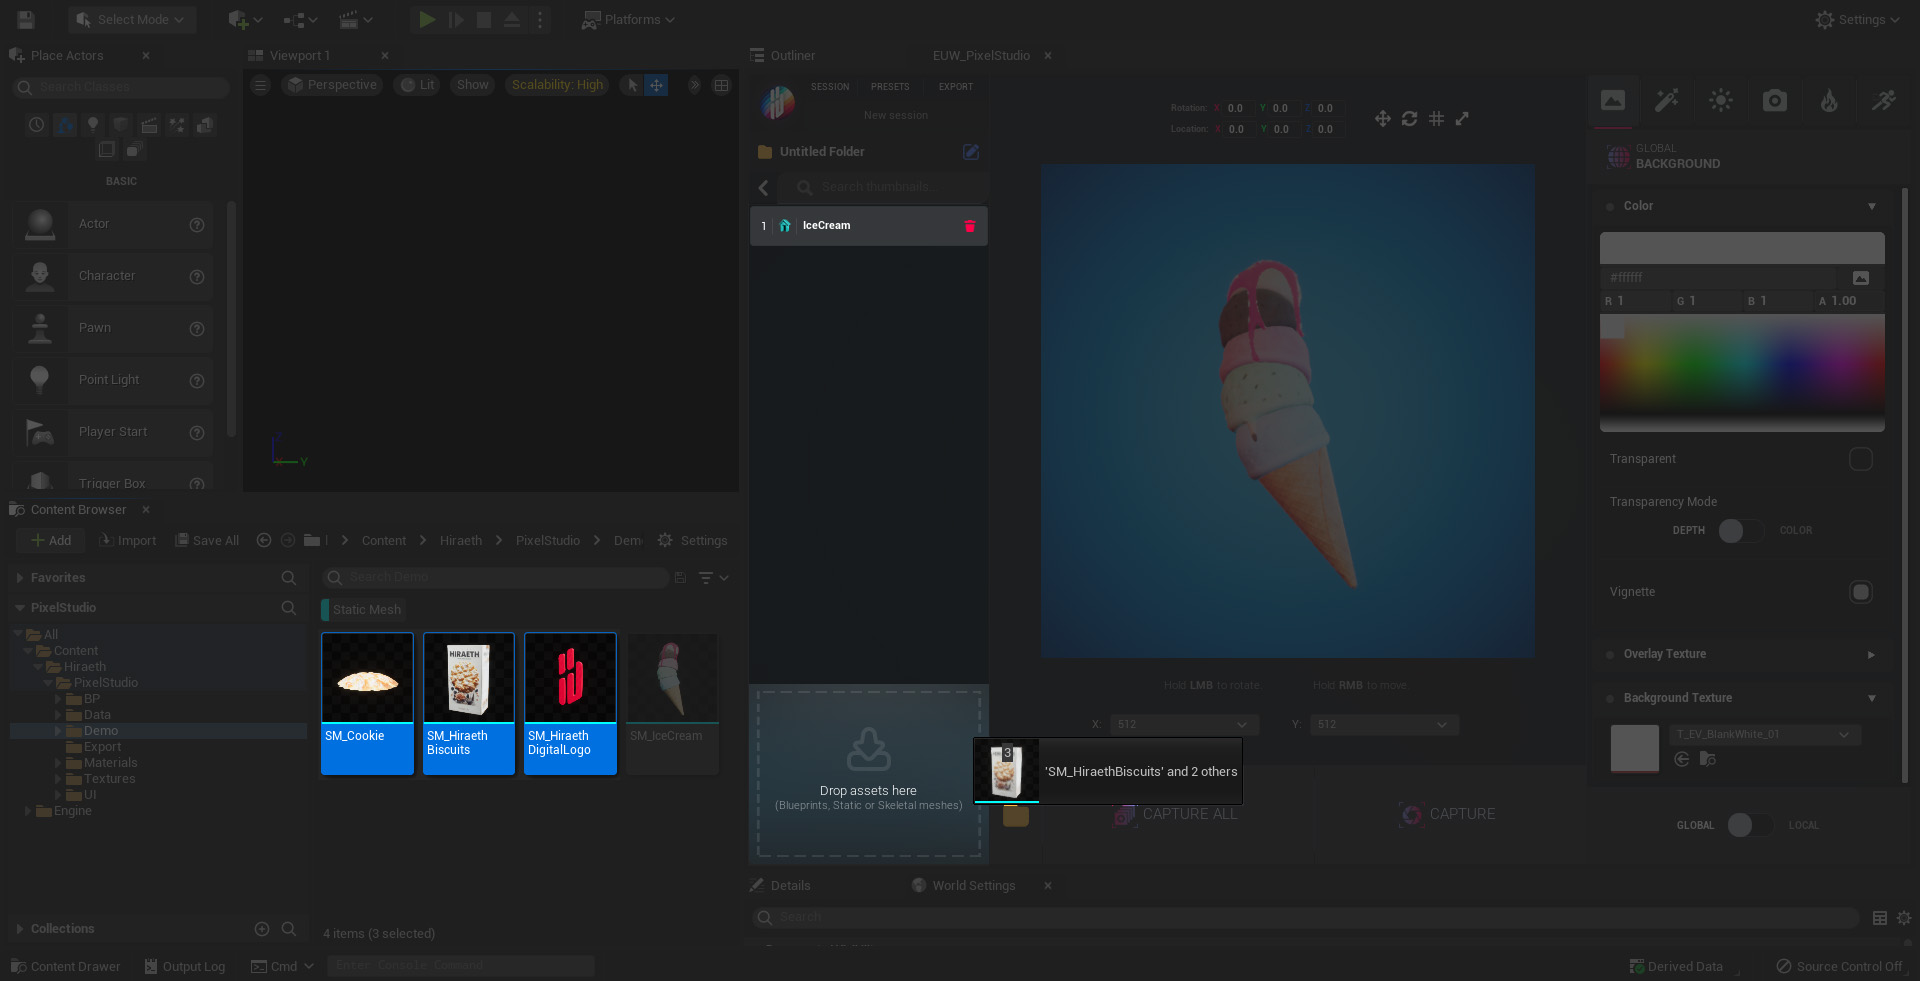
Supported Asset types:
 Static meshes
 Skeletal meshes
 Blueprints
Getting Started › User Interface Guide
Efficiently organize your assets using folders and session management features.
Getting Started › Global & Local modes
In Hiraeth Pixel Studio, you have the flexibility to customize your assets using two distinct modes: Global Mode and Local Mode.
Understanding the difference between these modes will help you streamline your workflow and achieve the desired consistency or individuality across your designs.
- Global Mode: In Global Mode, any customization options you select - such as background, effects, lighting, camera settings and particles - are uniformly applied to all objects within your current session. This ensures a consistent style across multiple assets. However, each object's position and rotation remain independently adjustable, allowing for varied arrangements within the uniform style. For example, setting a specific lighting effect in Global Mode will apply that effect to all objects, but you can still position and rotate each object individually to create a dynamic composition.
- Local Mode: In Local Mode, you have the flexibility to assign unique customization options to each individual object. This means that backgrounds, effects, lighting, camera settings and particles can differ from one object to another, enabling a diverse range of styles within the same session. As in Global Mode, each object's position and rotation are independently adjustable.
By selecting the appropriate mode, you can effectively manage your assets to achieve the desired visual outcomes in Hiraeth Pixel Studio.
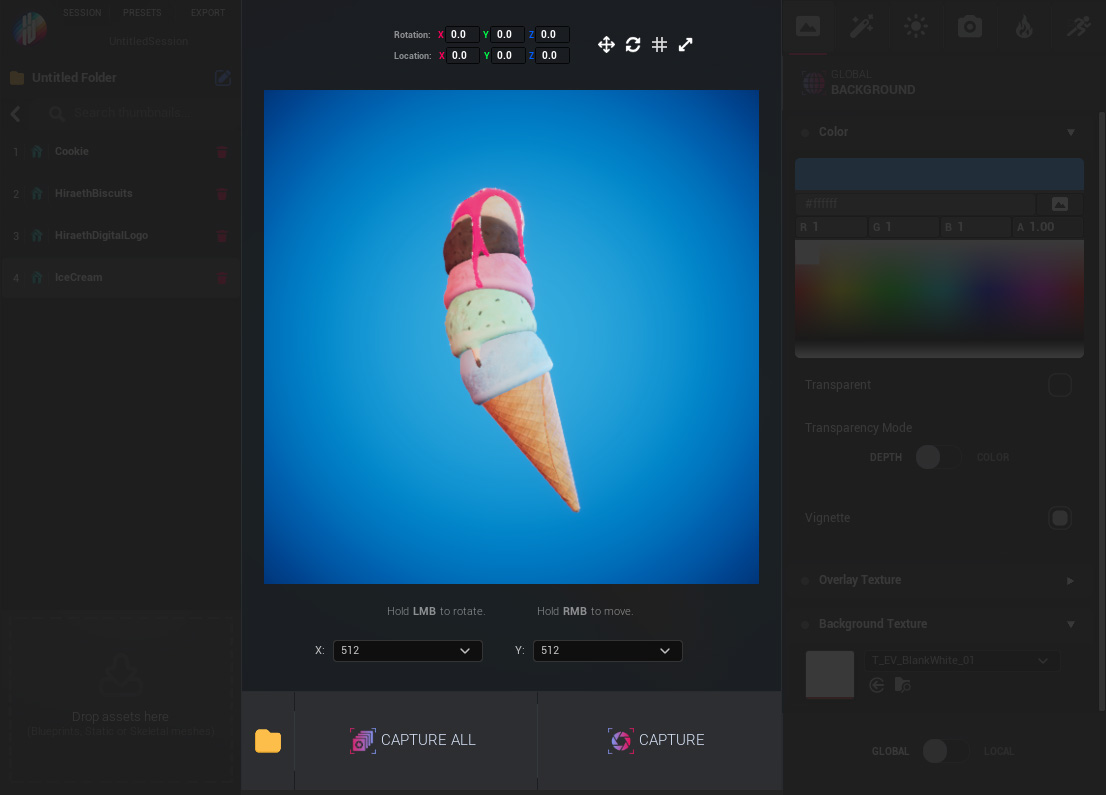
Customization Options › Background
The Background section lets you design the backdrop of your scene with color, textures, and effects—perfect for both clean product shots and stylized compositions.
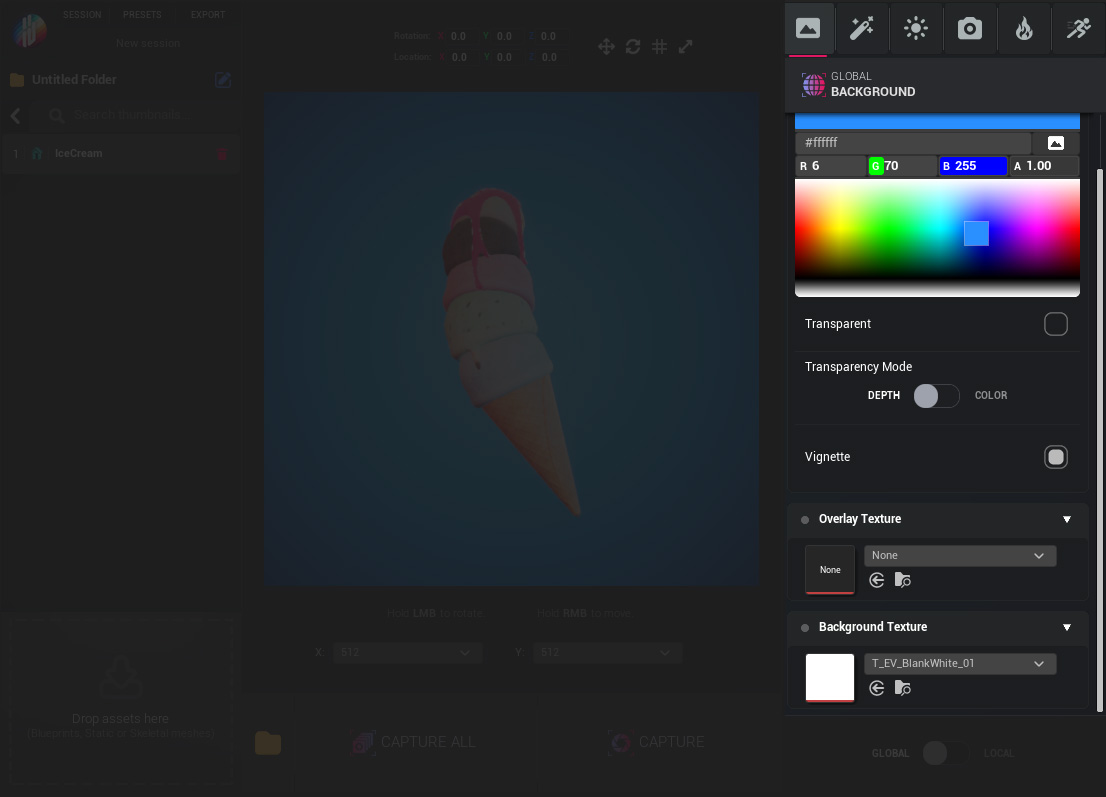
Options:
- Color Picker – Set the solid background color.
- Transparent Checkbox – Enable or disable transparency for the background.
- Transparency Mode Toggle – Switch between Depth (based on scene depth) and Color (based on pixel colors) transparency modes.
- Vignette Checkbox – Apply a soft vignette to focus attention toward the center.
- Background Texture – Choose a texture to display behind the asset.
- Overlay Texture – Add a texture that sits on top of the background (but behind the object), useful for things like branding elements, watermarks, or subtle overlays.
Customization Options › Effects
The Effects section allows for visual enhancement of thumbnails using stackable and customizable post-processing effects.
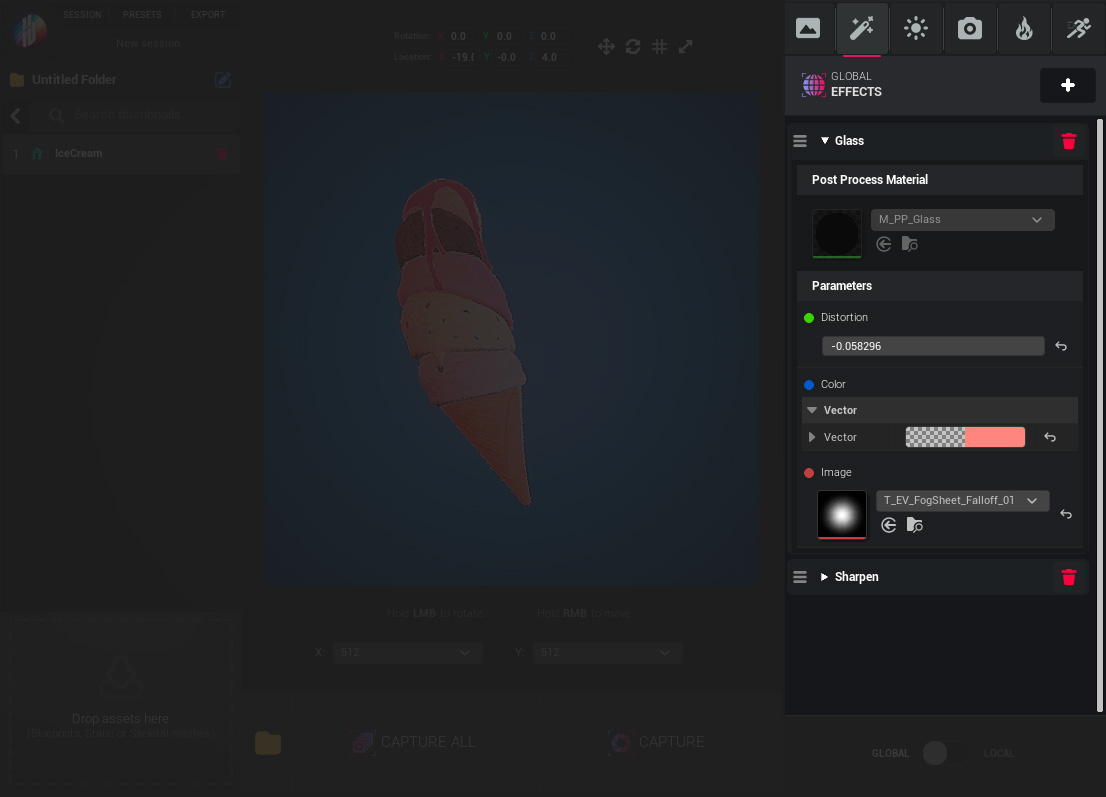
Options:
- Add Effect – Click “Add Effect” to choose from a library of available effects.
- Effect Order – Drag and drop effects to reorder them and control their rendering priority.
- Custom Parameters – Each effect comes with unique settings to fine-tune the visual outcome.
Adding New Effects:
Navigate to
- Content
- Hiraeth
- ThumbnailStudio
- Data
- Datatables
- DT_Effects .uasset
and open DT_Effects datatable to add new effects.
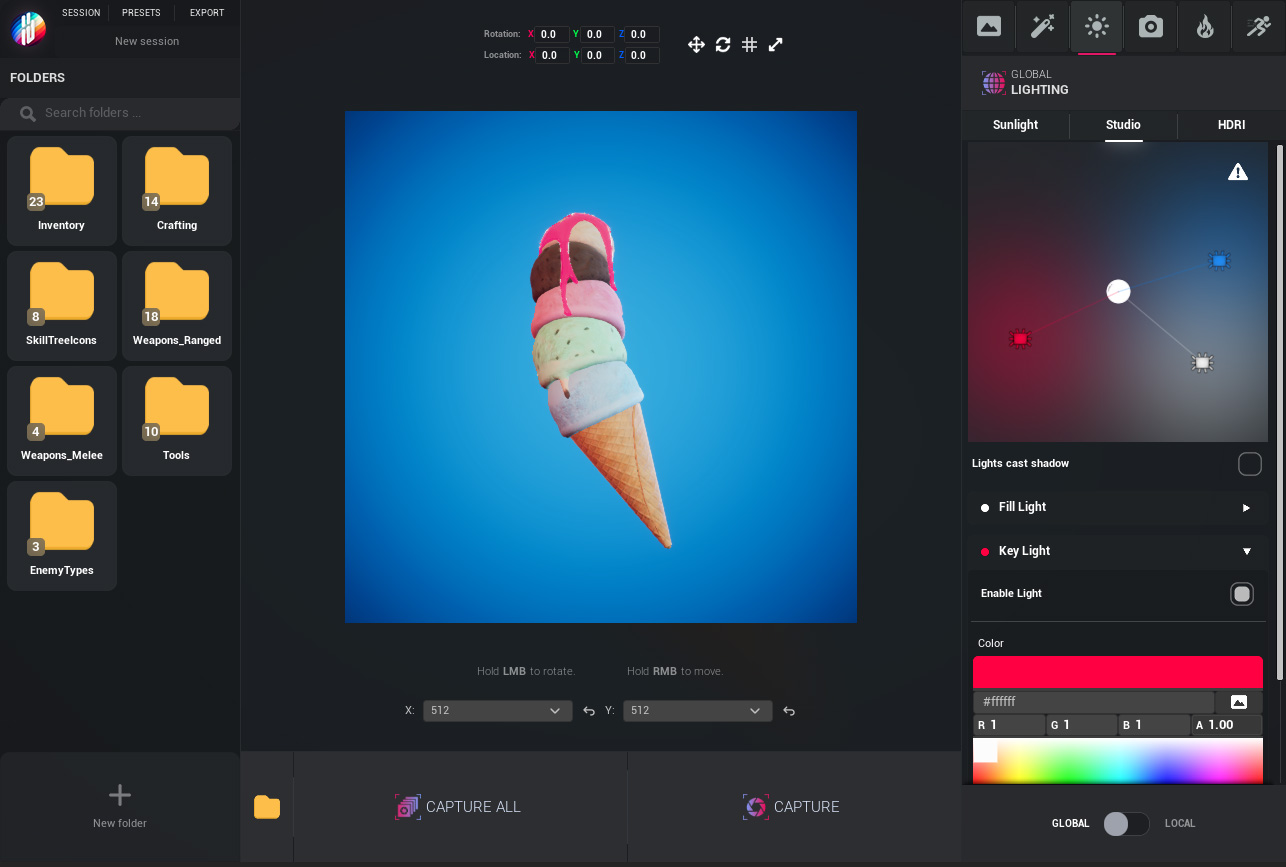
Customization Options › Lighting
The Lighting section provides full control over how assets are lit in the viewport. Whether you're aiming for a realistic studio look, stylized lighting, or an ambient HDRI environment, this section allows for quick adjustments and detailed customization through three sub-sections: Sunlight, Studio, and HDRI.
Sunlight
Simulates a directional sunlight source for natural outdoor lighting.
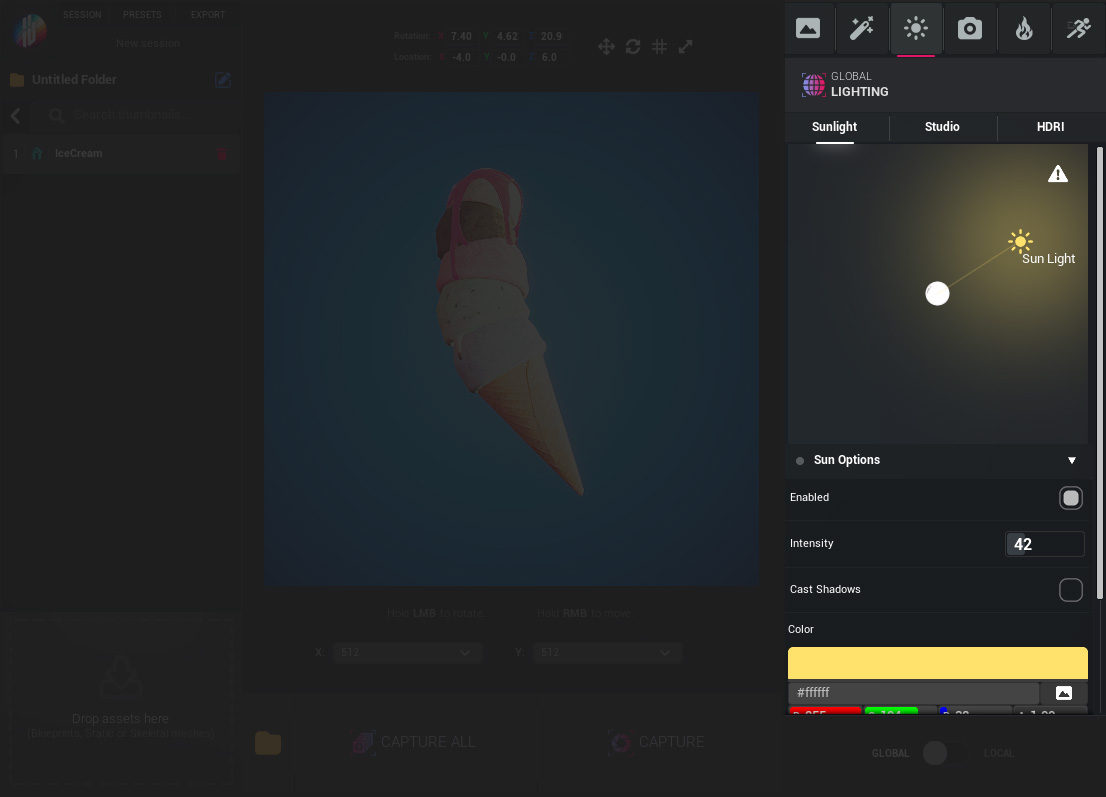
Options:
- Sun Rotation Area – Rotate the directional light to control light angle and shadow direction.
- Enabled – Toggle the sunlight on or off.
- Intensity – Adjust the brightness of the sun light.
- Cast Shadows – Enable or disable shadow casting from the sun.
- Color – Set the color of the sunlight to match the desired time of day or artistic tone.
Studio
Emulates a professional three-point lighting setup for detailed and dramatic presentation.
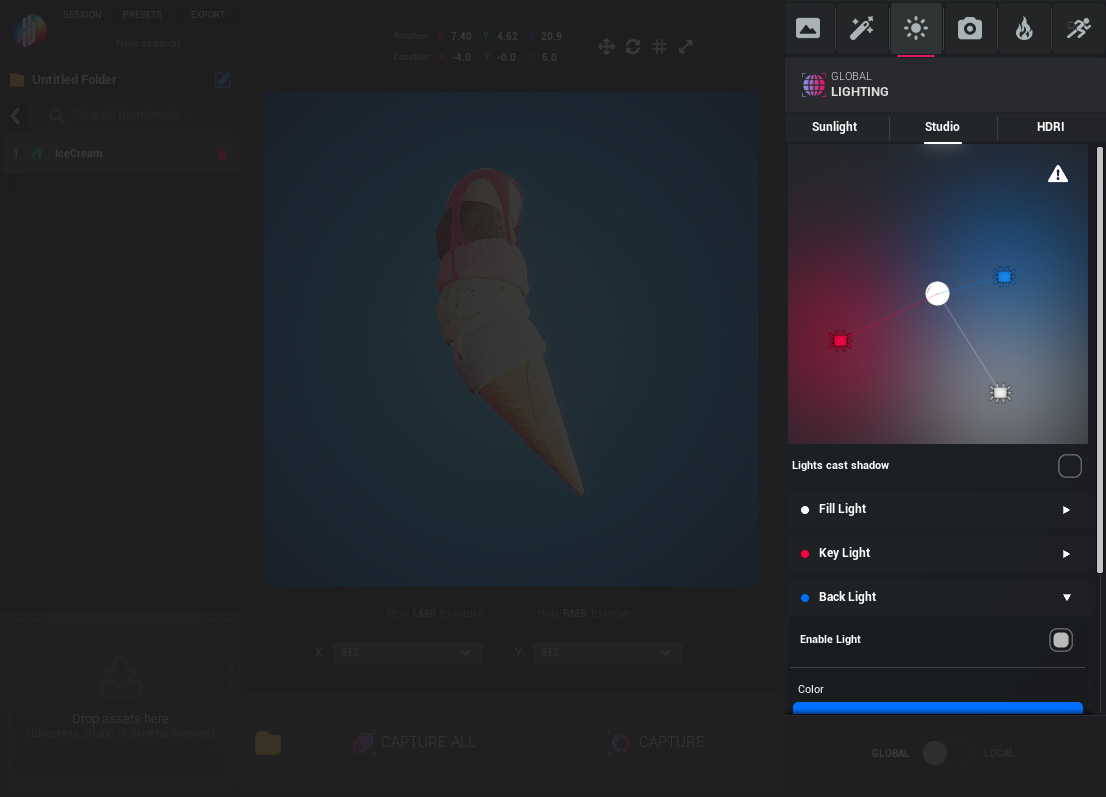
Options:
- Light Rotation Area – Rotate the studio rig to change the lighting angle across Fill, Key, and Back lights.
- Lights Cast Shadow – Toggle shadow casting for all studio lights.
- Fill / Key / Back Light Controls – Enable or disable individual lights and customize their color to create the perfect mood and balance.
HDRI
Lights the scene using High Dynamic Range Images (HDRIs) for realistic environmental reflections and ambient light.
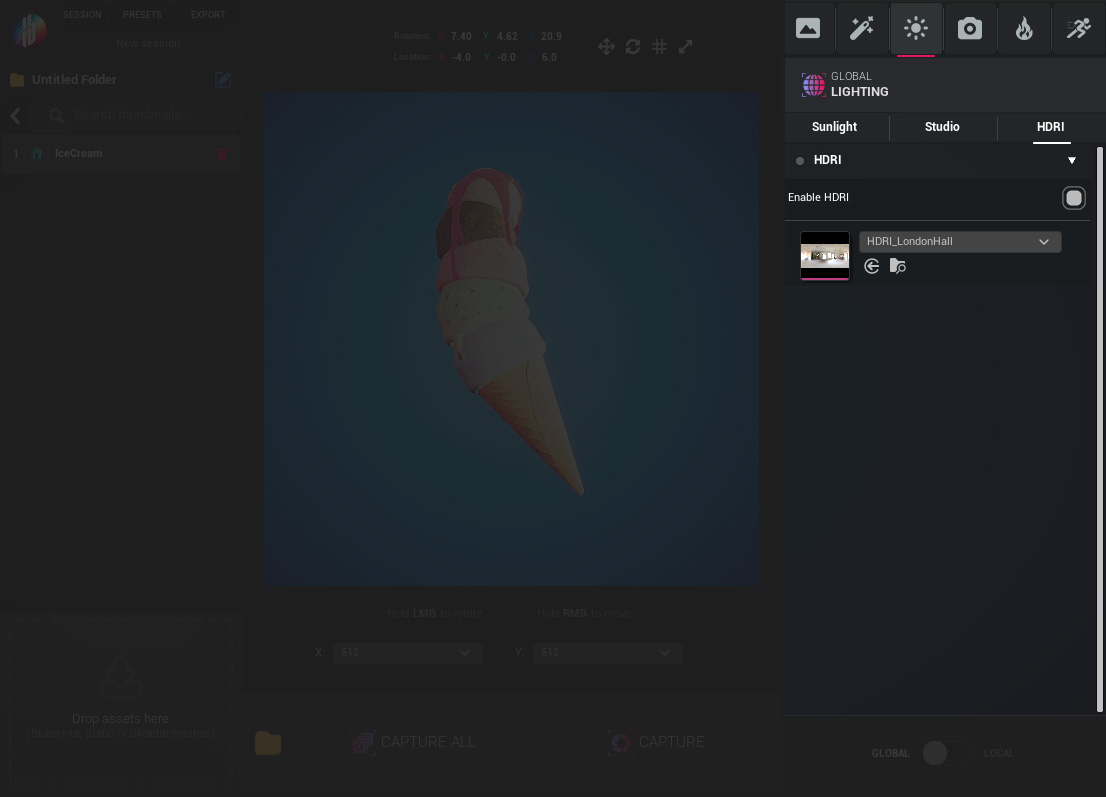
Options:
- Enable HDRI – Toggle HDRI lighting on or off.
- HDRI Texture Selector – Choose from available HDRI textures to set the scene’s ambient lighting and reflections.
Customization Options › Camera
The Camera section provides full control over how the asset is framed and rendered. It includes adjustments for projection style, framing, post-process effects, and color grading.
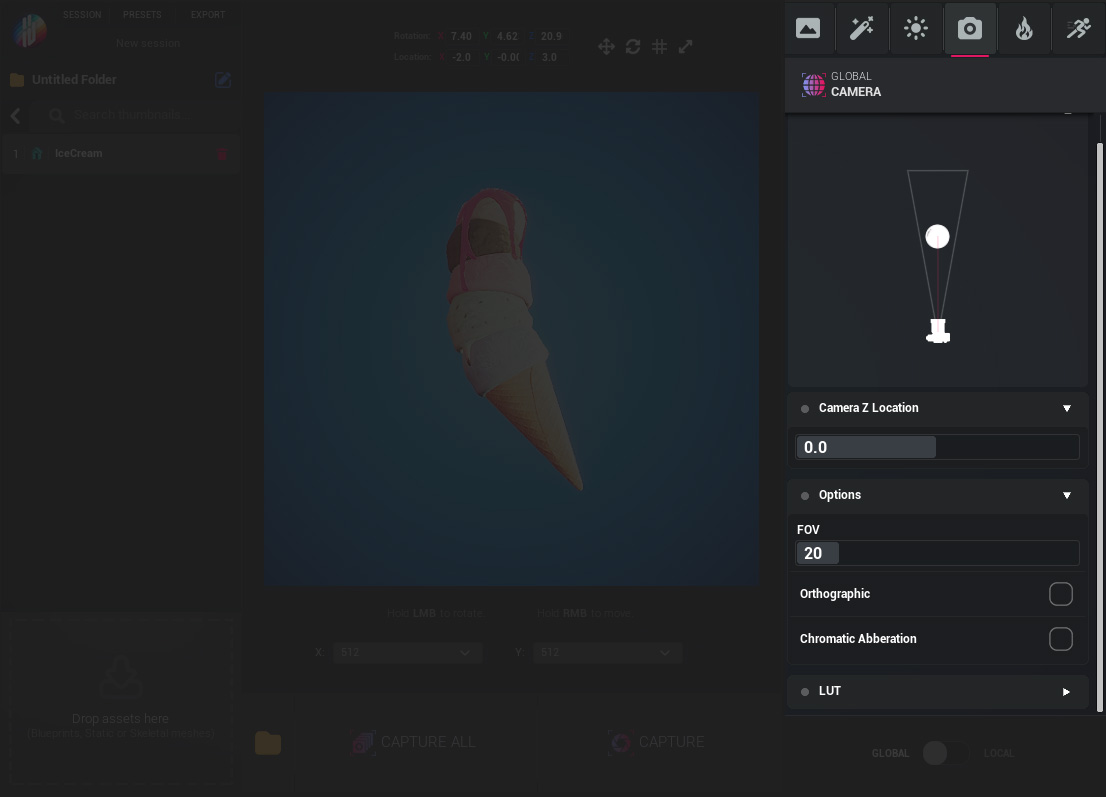
Options:
- Camera Rotation Control – Rotate the camera to change the viewing angle around the asset.
- Camera Z Location – Adjust the vertical (Z-axis) position of the camera to fine-tune framing.
- FOV – Set the camera’s field of view for perspective depth.
- Orthographic Checkbox – Switch to orthographic projection for flat, distortion-free renders.
- Chromatic Aberration – Enable chromatic aberration and tweak its intensity and start offset for visual flare or retro-style effects.
- LUT Section – Apply a LUT (Look-Up Table) texture to color grade your render and adjust its intensity.
Customization Options › Particles
Bring life to your thumbnails with real-time particle effects.
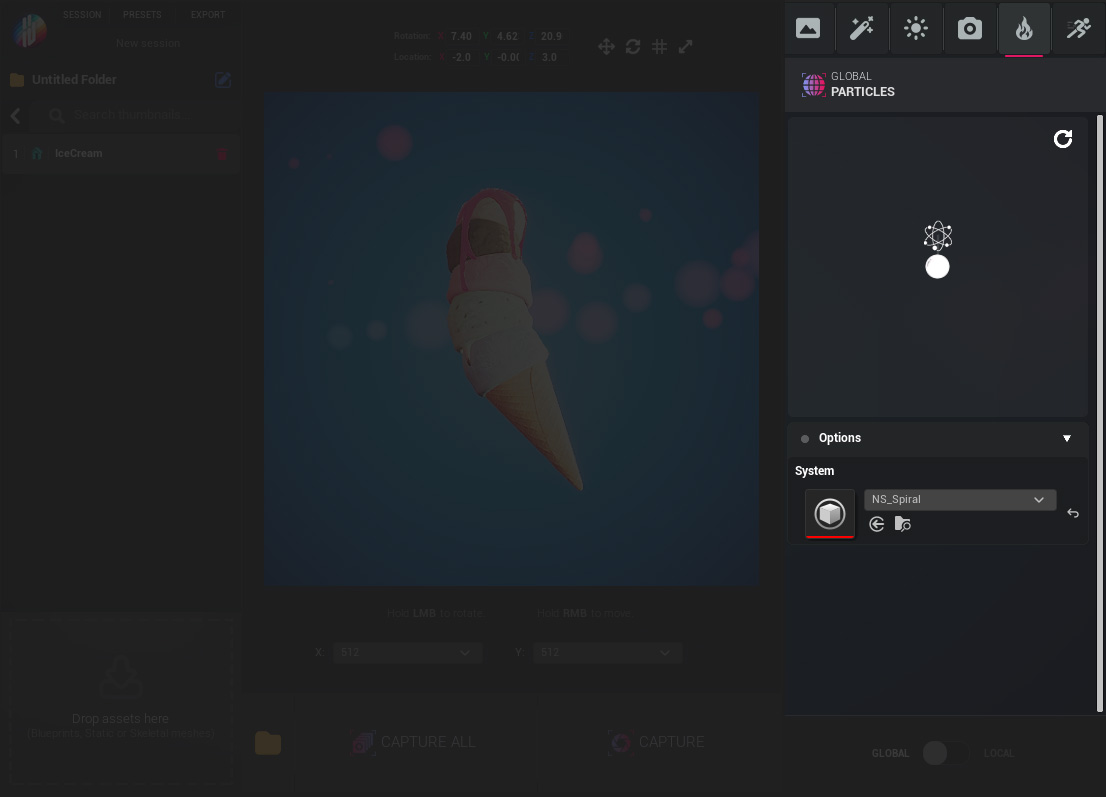
Options:
- Particle Control Area – Manage positioning and interaction of particle systems.
- System Variable – Choose which Niagara particle system to use.
- PreCapture Delay – Set a delay before capture to allow effects to fully initialize.
Customization Options › Sprites & Flipbooks
This section is only available when a Skeletal Mesh is selected.
Generate sprite sheets and flipbooks from animated skeletal meshes.
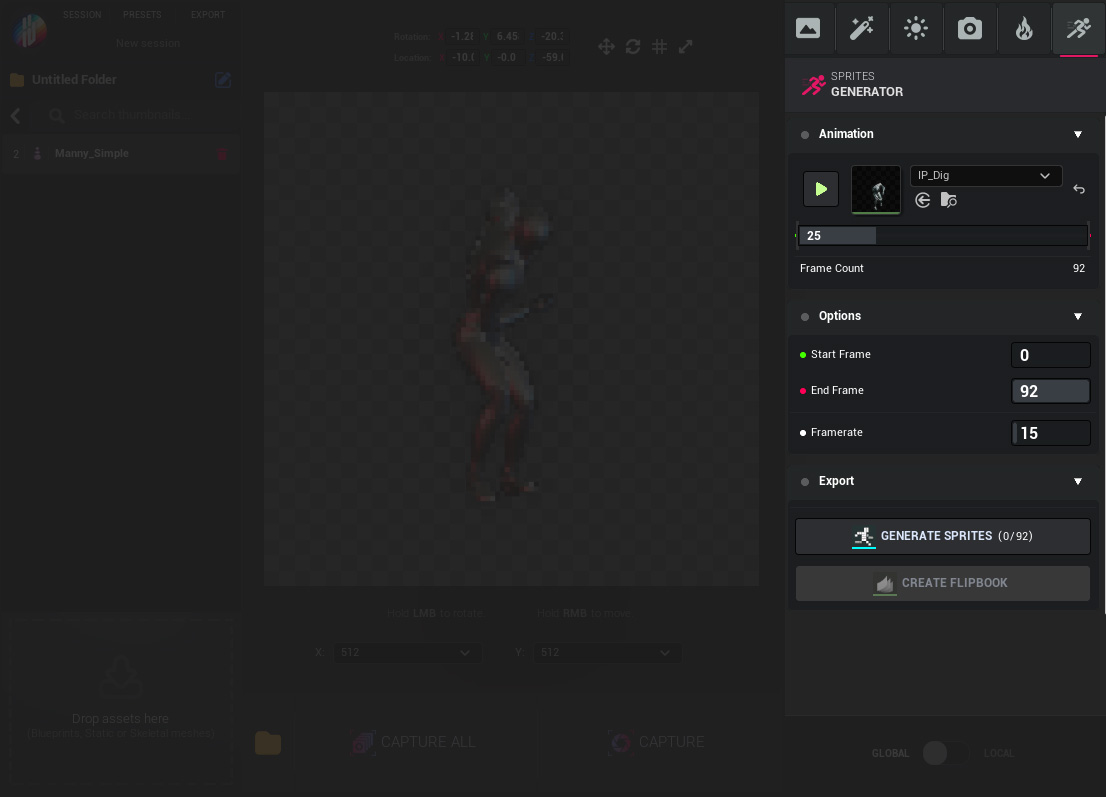
Options:
- Animation – Select an animation sequence to use.
- Time Slider – Scrub through the animation to preview individual frames.
- Frame Count – Displays total frames between the selected Start and End.
- Start Frame / End Frame – Define the animation frame range to capture.
- Framerate – Set the output frame rate for sprite generation.
Actions:
- Generate Sprites – Capture frames and generate a sprite sheet based on settings.
- Create Flipbook – Converts the generated sprites into a usable Flipbook once sprites are available.
Workflow › Previewing & Capturing
The center of the interface is the Preview Area, where your selected asset is rendered in real-time using the current lighting, background, camera, and effects settings.
View Controls:
Left Mouse Button (LMB) – Rotate the asset.
Right Mouse Button (RMB) – Move the asset.
X / Y Dropdowns – Set the render resolution for capturing thumbnails.
Folder Button:
Located to the left of the “Capture All” button.
Clicking it opens the Export Path folder directly in the Unreal Editor Content Browser. This allows quick access to the location where your thumbnails will be saved.
Note: The export path is configurable and persists across sessions (see “Export Path Settings”).
Capture Buttons:
Capture All – Renders and saves thumbnails for all assets in the current session.
Capture – Renders and saves the currently selected asset.
Workflow › Setting Export Paths
Accessible from the top bar under Export > Set Export Path.
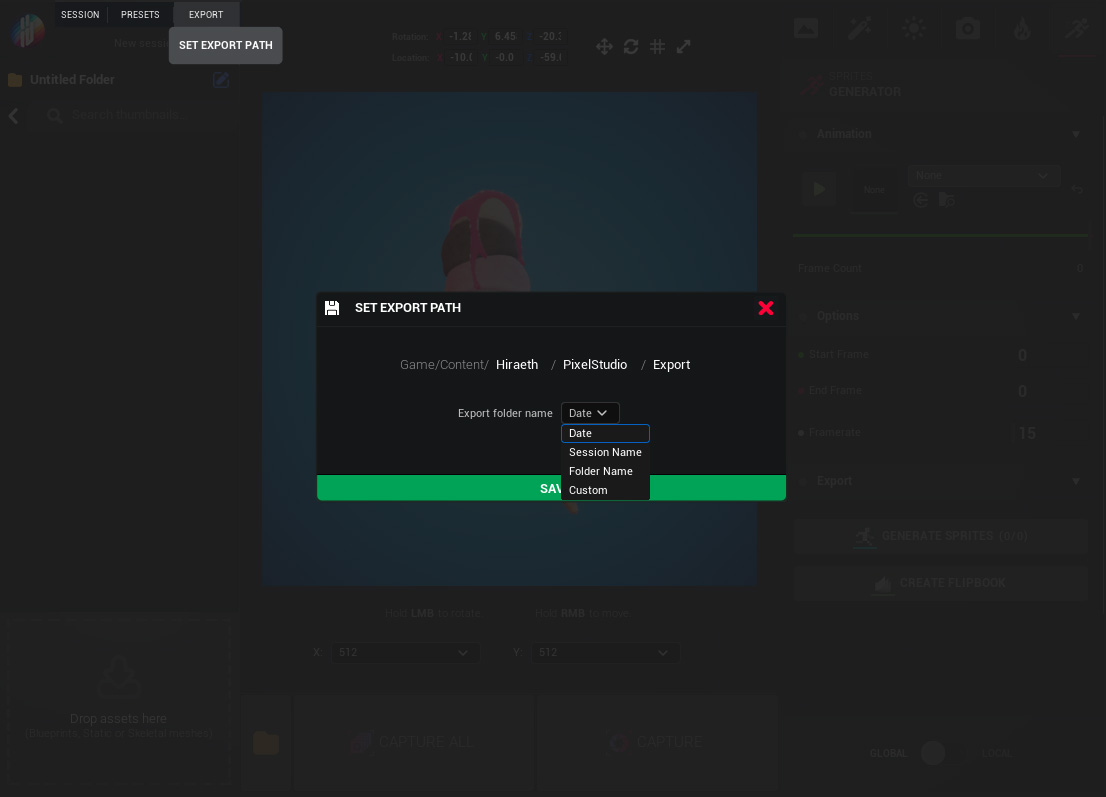
Options:
- Export Path – Define the base folder where all captured thumbnails will be saved.
- Folder Name Mode – Choose how to name the subfolder inside the export path. Options include:
- Date – Automatically names the folder with the current date.
- Session Name – Uses the session name as the folder.
- Folder Name – Uses the name of the folder currently selected in the app.
- Custom – Enter your own folder name.
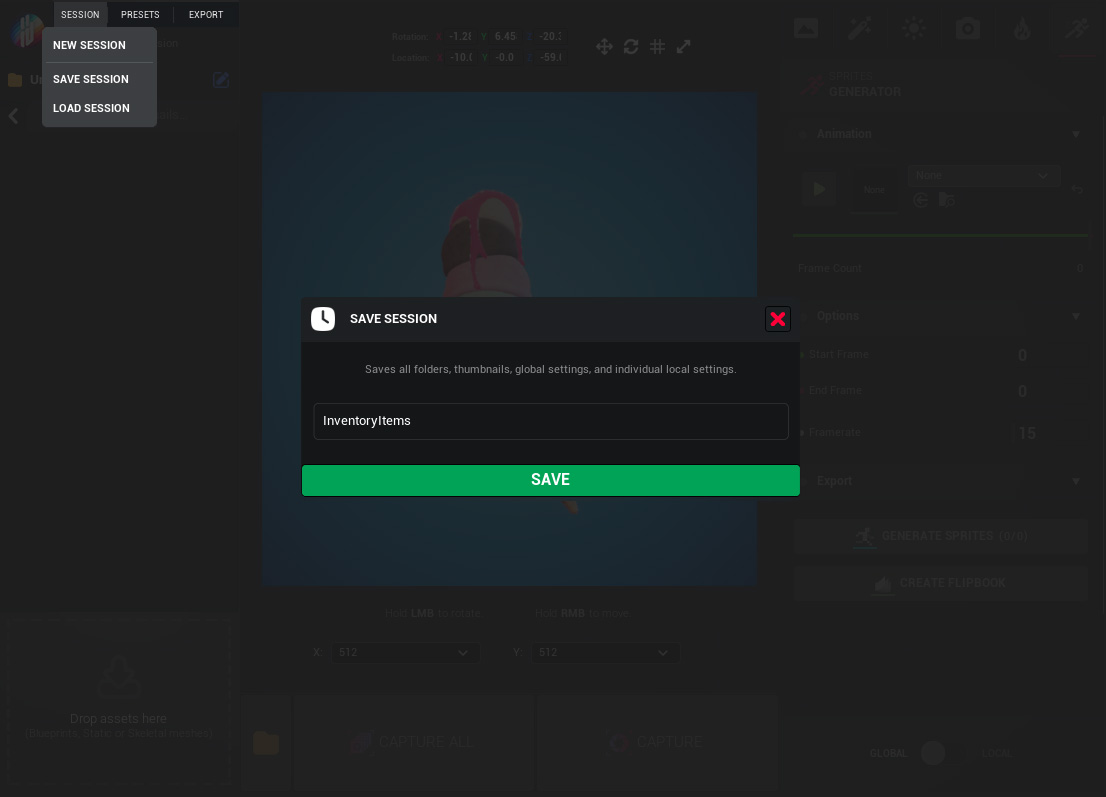
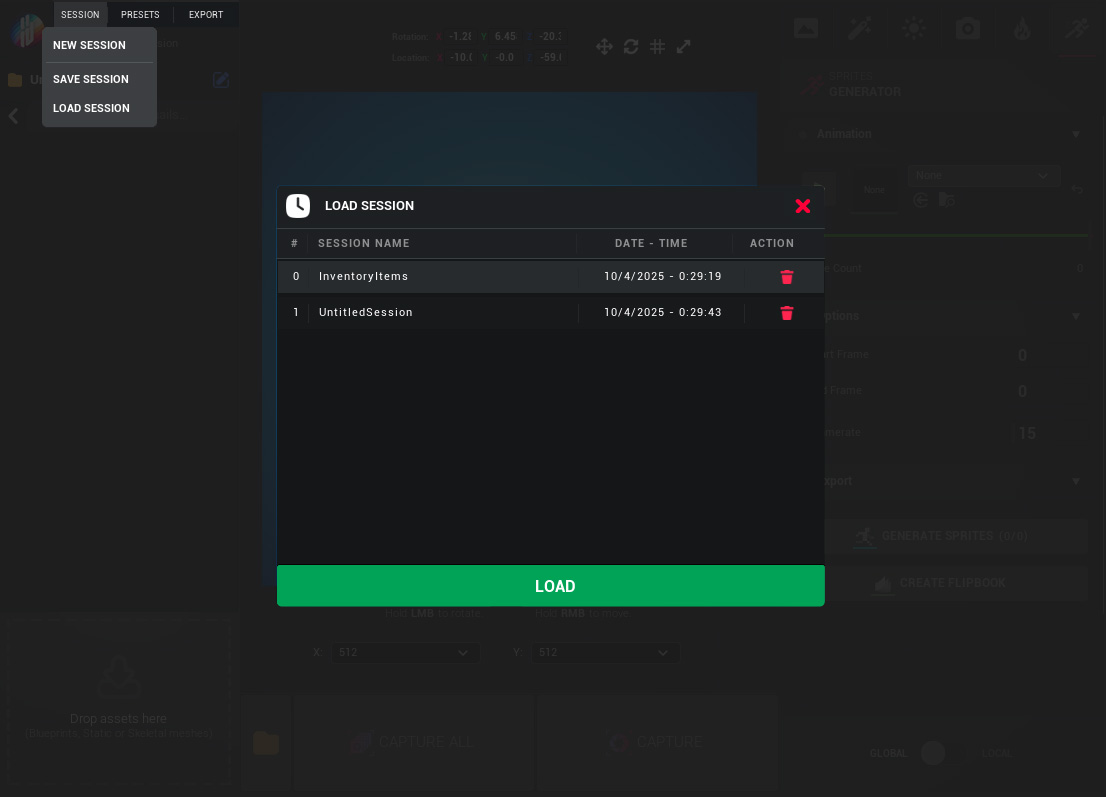
Workflow › Session Management
Sessions preserve your workspace and structure between app uses.
Save Session: Located in the top bar under Sessions > Save Session.
Load Session: Located in the top bar under Sessions > Load Session.
Saving a Session includes:
- Folders and their structure
- All thumbnail objects
- Resolutions
- Menu and UI option states
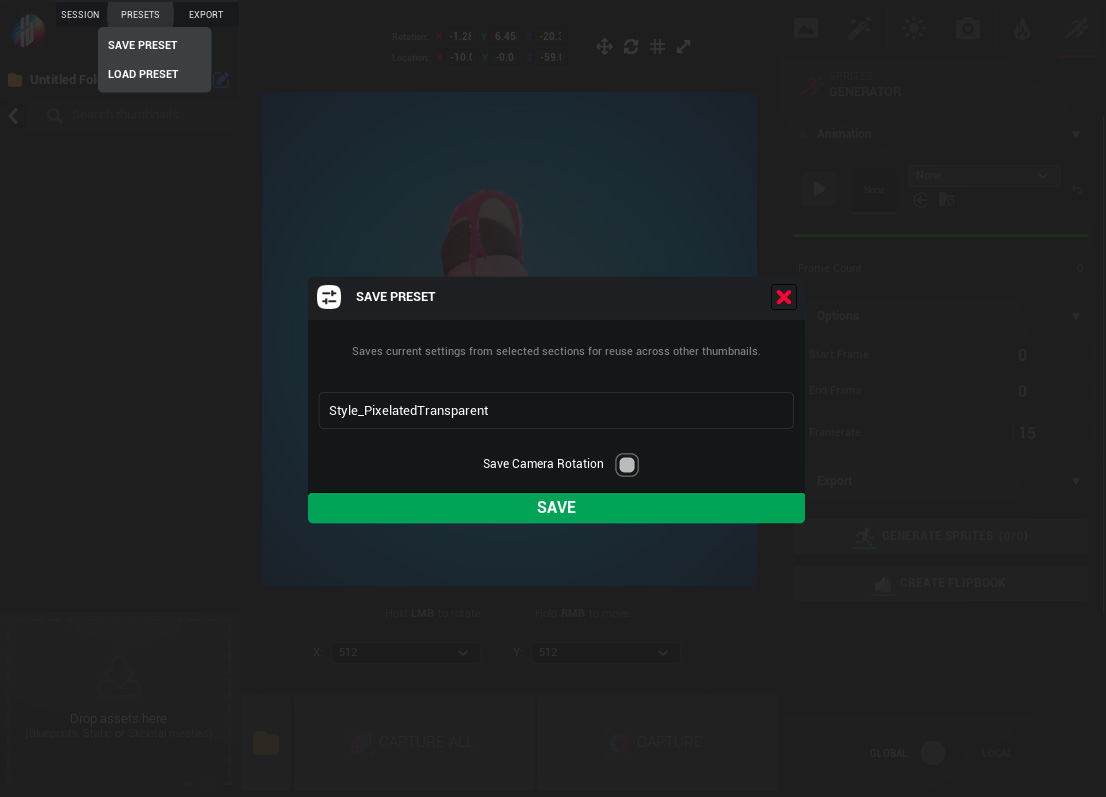
Workflow › Preset Management
Presets let you save and reapply visual setups easily.
Save Preset: Located in the top bar under Presets > Save Preset.
Load Preset: Located in the top bar under Presets > Load Preset.
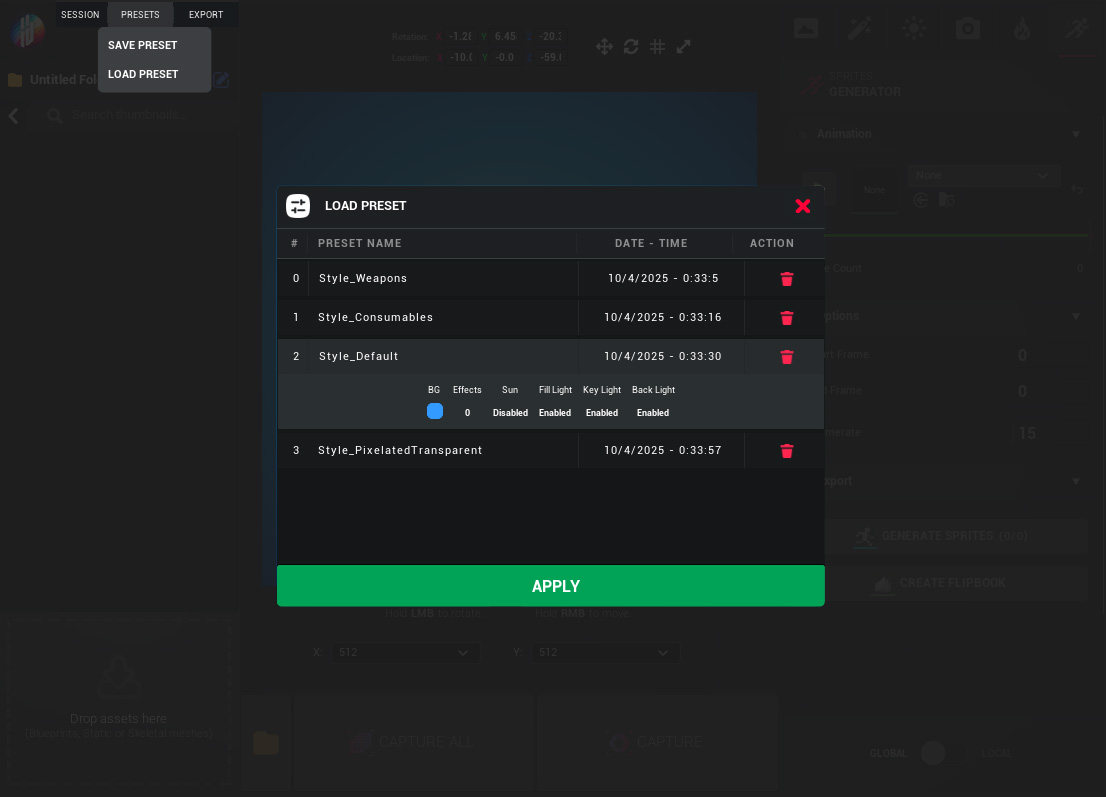
Saving a Preset stores all current configurations from the right panel, including:
- Lighting
- Background
- Effects
- Camera settings (optional: can include camera rotation)
- Presets can be applied locally (per asset) or globally (across the session).
Error handling › Level Not Empty
Message:
“Level not empty: Multiple actors detected in the level. We recommend using an empty level for accurate thumbnail creation.”
What it means:
Hiraeth Pixel Studio works best when used in an empty level to avoid unintended shadows, lighting, or object interference caused by other actors in the scene.
Why it matters:
Additional actors can distort the appearance of your thumbnails or introduce unwanted visual artifacts.
How to fix it:
Go to File > New Level > Empty Level to start with a clean environment.
Error handling › Thumbnail Actor Not Found
Message:
“Thumbnail actor not found. EUB_PixelStudio not found in level.”
What it means:
The core actor required for rendering thumbnails (named EUB_PixelStudio) is missing from the level.
Why it matters:
Without this actor, the tool cannot function properly or render your thumbnails as expected.
Additional Info:
In most cases, the tool will automatically add the required actor a few seconds after initialization. If it doesn’t, a message will appear along with a Fix button. Clicking the Fix button will manually place the missing actor into the level.
How to fix it:
Wait a few seconds for the tool to add the actor automatically. If it doesn’t appear, click the Fix button in the warning message to add it manually.
Error handling › Low Scalability Error
Message:
“Your current Scalability settings are set to Medium or lower. For the best visual fidelity, please set Scalability to High or above.”
What it means:
Your engine’s performance settings are currently too low to take full advantage of the tool's visual features.
Why it matters:
Low scalability settings may result in blurry textures, low-quality lighting, or missing visual effects.
How to fix it:
Open the Settings > Engine Scalability Settings menu and set everything to High or Epic for best results.
Error handling › PostProcess Volume Detected
Message:
“Post Process Volume detected in the level. This will cause conflicts in UE versions above 5.0.”
What it means:
An active Post Process Volume has been found in your level. In Unreal Engine 5.0 and later, this can conflict with how Hiraeth Pixel Studio renders thumbnails.
Why it matters:
Post Process Volumes may override the tool’s custom visual settings, leading to unexpected lighting or effects.
How to fix it:
Remove the Post Process Volume from the level for best compatibility.
Changelogs
- Added warning for non-empty levels when launching the tool.
- Fixed thumbnails not loading when updating folder title.
- Fixed orthographic camera width bug when loading session.
- Added Camera Z Location option.
- Added index numbers to thumbnail items to improve readability in list.
- Added an overlay texture option to the Background section.
- Added an Open Export Path button for one-click access to export paths.
- Added Opacity Mask support to Background material.
- Added a new ASCII effect.
- Fixed HDRI settings not restored correctly on session load.
- Fixed Studio lights not applying correctly when clicking an item.
- Fixed Global mode color picker indicator not updating when applying a preset.
- Fixed Global mode Transparency checkbox not updating when applying a preset.
- Separated resolution input into independent X and Y enums with power-of-2 values for finer control.
- General UX improvements.
- Added Sprite and flipbook generation features for Skeletal Meshes.
- Fixed rotation and location info on item clicked.
- Added manual rotation and location controls.
- Added PostProcess warning.
- Changed product title from Thumbnail Studio to Pixel Studio.
- Rearranged demo folders.
- Changed error handling system.
- Fixed a visual bug when an empty folder is clicked.
- Fixed color palette not resetting sample on new session.
- Disabled Load and Apply buttons when no data is available.
- Fixed duplicate session and preset names.
-Bug fixes
-Initial Release.